14 Tips To Optimise Your Hub Page for Maximum Engagement

Hub pages offer an overview that helps visitors explore your specific service pages. Effective website structure is essential for boosting user engagement and conversions, and hub pages play a key role. In this guide, we’ll show you how to optimise your service hub pages to maximise impact. Stay tuned for our full guide on service page optimisation, coming later this week!
If you haven’t already, check out our previous blog on About Us pages, to learn how to make one of your most visited pages truly connect with your audience.
What Are Hub Pages?
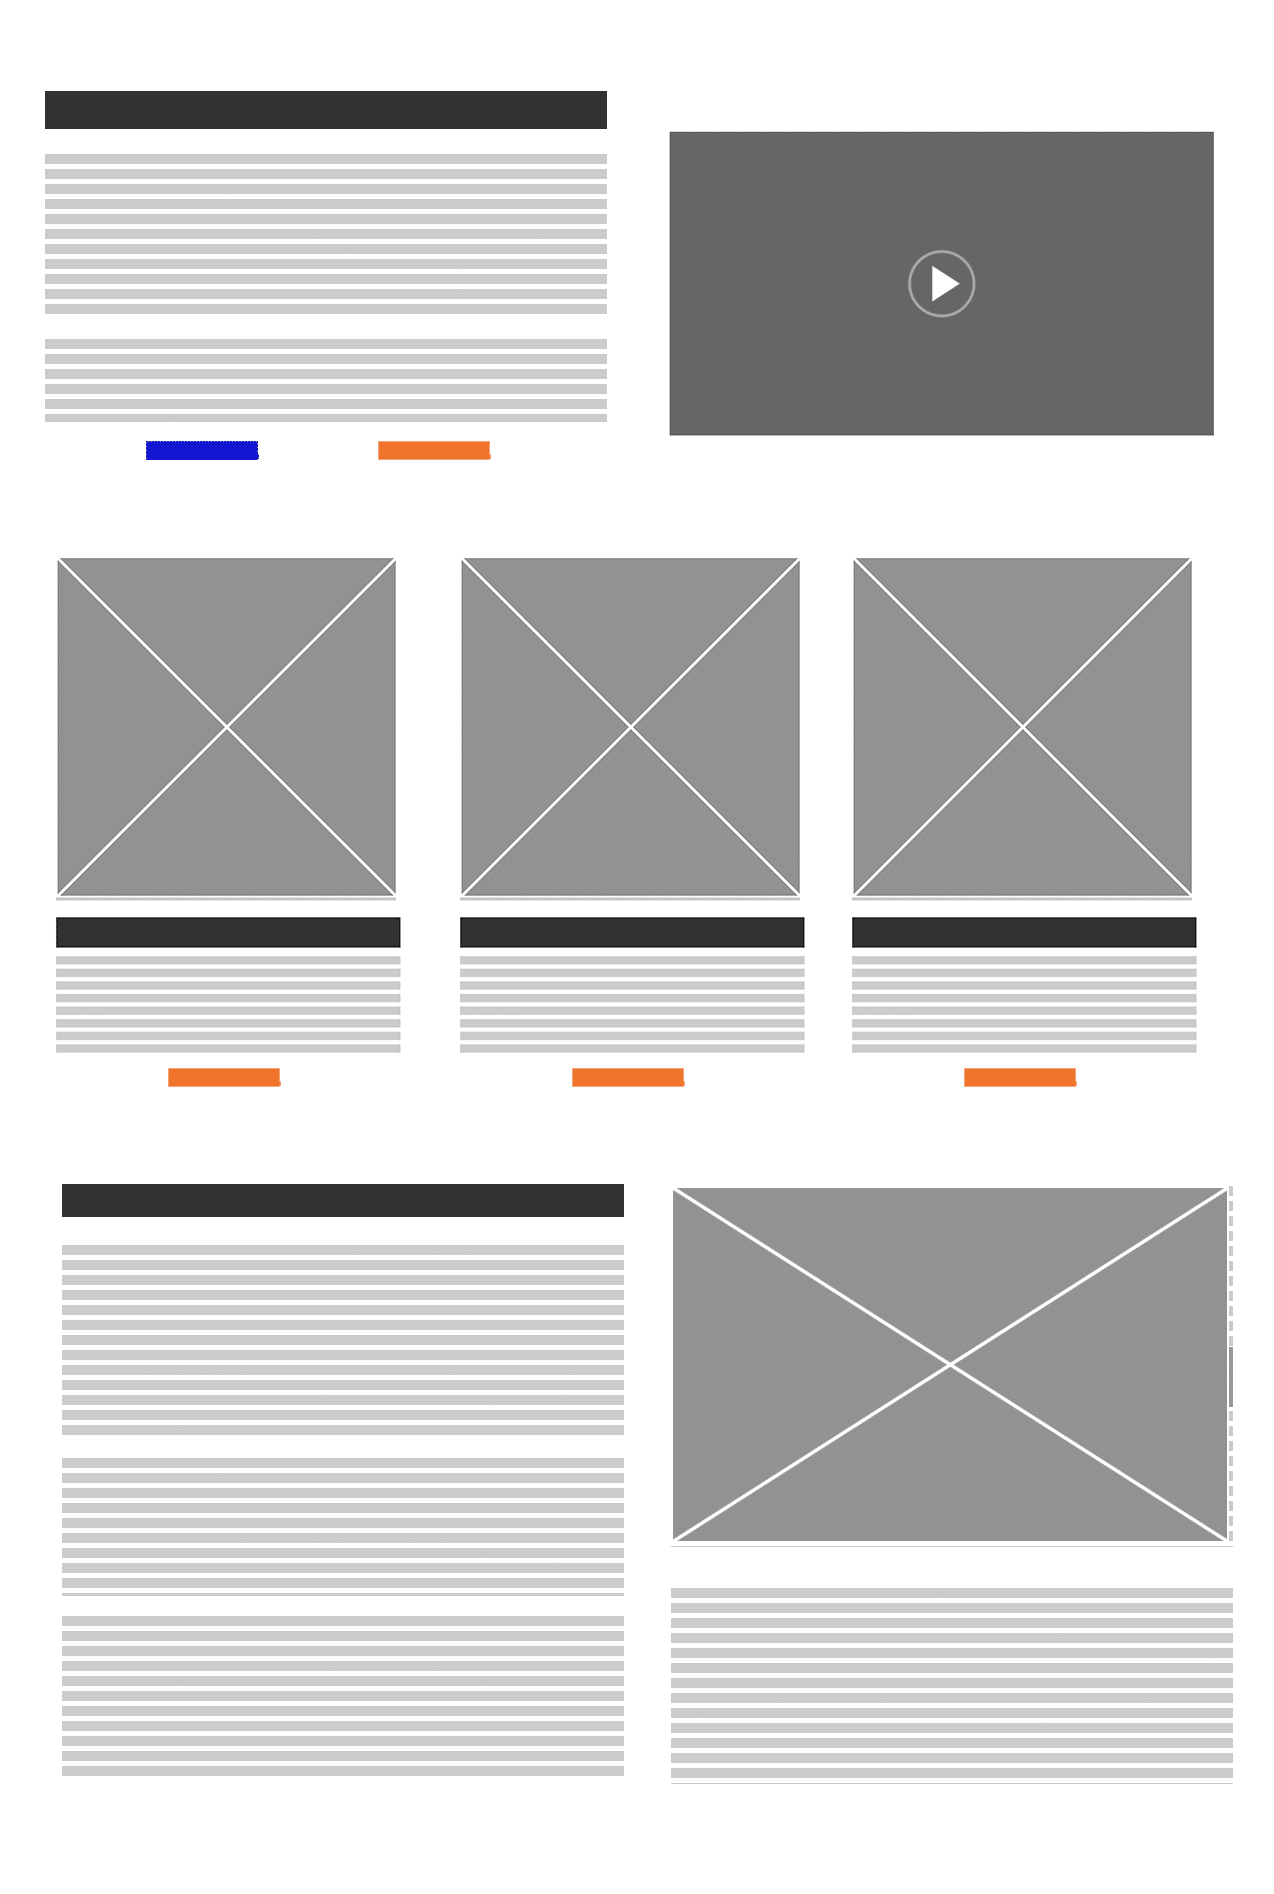
Hub pages act as central directories for your main services, offering an overview that guides visitors to explore specific service pages. They make navigation easy and help users understand your complete range of offerings.
Ready to improve your hub pages? Let’s dive into the details below!
Ultimate Hub Page Optimisation Checklist
Your hub page should provide a clear overview of your services and be easy to navigate. The main goal? To guide users seamlessly to individual service pages. Follow these steps to ensure your hub page delivers an effective, user-friendly experience.
1. Use a Descriptive Page Title and Introduction
Your hub page’s title and introduction play a crucial role in establishing the page’s purpose. They should communicate to users what they will find on the page and how it’s relevant to them. A well-crafted title captures attention. While a brief introduction clarifies the scope, encouraging users to navigate further.
Key Details:
- Be Specific: Use a title like “Our Web Design Services” or “Explore Digital Marketing Solutions.”
- Keep the Introduction Brief: Use 1-2 sentences to introduce the page and explain what users can expect.
- Highlight Navigation: Make it clear that this page links to various detailed service options.
Use a clear, descriptive title to grab attention and set the tone for user exploration.
2. Service Benefits Overview
Before listing individual services, provide a broad overview of the general benefits of the services you offer. This sets a positive tone and engages users by immediately addressing potential pain points or goals.
Key Details:
- Highlight General Benefits: Use bullet points to list advantages. Eg: “Better outcomes,” “Increased efficiency,” or “Stronger performance.”
- Keep It Brief: Use concise language to convey value quickly without overwhelming the reader.
- Focus on Results: Make it clear how your services add value. Whether it’s solving problems, achieving business goals, or delivering measurable results.
Summarise general benefits to engage users before they explore individual services.
3. Organise Services into Logical Categories
Grouping services into logical categories makes navigation more intuitive. This helps users find what they need faster. Organised categories also allow users to understand the range of services at a glance.
Key Details:
- Use Clear Headings: Divide services into broad categories like “Web Design,” “SEO,” or “eCommerce.”
- Limit Categories: Use 3-5 broad categories for simplicity and clarity.
- Include Subcategories if Needed: Use dropdowns or expandable lists for more detailed services.
Organise services logically to make navigation easier and improve user experience.
4. Engaging, Brief Descriptions for Each Service
Concise service descriptions allow users to quickly understand what each service offers. This sets the expectation before they dive into specific pages.
Key Details:
- Keep Descriptions Short: Use 1-2 sentences that focus on the service’s primary benefit.
- Highlight Outcomes: Make it clear how the service solves a problem or achieves a goal.
- Consistent Formatting: Keep descriptions similar in style and length to maintain consistency.
Keep service descriptions brief to ensure quick understanding and engagement.
5. Strong, Visual CTAs for Each Service
Clear CTAs (Calls-to-Action) encourage users to explore specific services further. Well-designed CTAs guide users toward the next steps, making navigation seamless.
Key Details:
- Use Button-Style CTAs: Examples include “Learn More,” “Explore,” or “View Details.”
- Place CTAs Next to Descriptions: Ensure CTAs are easily accessible and visible.
- Consistent Style: Use the same colour and style for all CTAs to maintain uniformity.
Use consistent, visible CTAs to encourage deeper engagement.
6. Incorporate Trust Signals Near Categories
Adding trust elements like client logos, awards, or brief testimonials near service categories helps build credibility. Trust signals reassure users and increase their willingness to explore further.
Key Details:
- Client Logos and Awards: Place a row of logos or awards at the top or near relevant services.
- Short Testimonials: Include brief testimonials next to specific service categories, if relevant.
- Use Real Client Names: Include client names or businesses to increase authenticity.
Use trust signals to boost credibility and encourage exploration.
7. Add Icons or Product Photos for Each Service
Adding icons or product photos for each service makes the page more visually engaging and helps users identify services quickly. These visuals can break up text and make the page more appealing.
Key Details:
- Use Icons or Photos: Choose icons for services that are more abstract, or use product photos when showcasing tangible products.
- Consistent Visual Style: Ensure all icons or visuals follow the same design style for cohesion.
- Use High-Quality Visuals: Custom-designed icons or high-quality product photos align better with your brand.
Use consistent icons or images to make services easy to identify.
8. Ensure the Page is Easy to Scan
A scannable page layout helps users quickly find the information they need, improving overall engagement. The right structure encourages users to explore more.
Key Details:
- Use Bullet Points: Summarise key benefits in bullet points for easy reading.
- Add Whitespace: Ensure enough space between sections to prevent overcrowding.
- Bold Key Terms: Highlight important terms or phrases to help users quickly grasp the main points.
Structure your page for quick scanning and better user engagement.
9. Add Video Integration for Better Engagement
Adding videos can make your hub pages more engaging and help users understand your services more effectively.
Key Details:
- Short Overview Videos: Include a brief video that introduces the broader range of services offered on your hub page.
- Fast Loading and Mobile-Friendly: Ensure the video is optimised for fast loading and displays well on mobile devices.
- Video Transcripts: Add transcripts to maintain accessibility and support SEO.
Use videos to enhance user understanding and engagement, making navigation more interactive.
10. Our Difference / Why Choose Us
Including a brief section that highlights your unique selling points (USPs) sets you apart from competitors. This section provides a compelling reason for users to choose your services and builds credibility. Place this section just after the service list for optimal visibility.
Key Details:
- Highlight USPs: Mention unique selling points like “20+ Years of Experience” or “Proven Results.”
- Use Bullet Points: List key benefits succinctly to maintain user interest.
- Include Client Success Stories: Use short testimonials or case studies to showcase results.
Highlight your unique strengths to differentiate from competitors.
11. Add a Closing Section with CTA
The closing section should summarise key services and include a strong, clear CTA that encourages the user to take the next step.
Key Details:
- Summarise Key Services: Reinforce the primary services and their benefits.
- Use Inviting Language: Examples include “Ready to Get Started?” or “Contact Us Today.”
- Multiple Contact Options: Provide a contact form, phone number, and email for easy access.
Use a strong closing CTA to guide users toward conversion.
12. Include Internal Links to Related Services and Blogs
Internal links help users discover related content and keep them engaged longer. This not only improves user experience but also boosts SEO performance. They are best positioned below your service list to encourage further exploration.
Key Details:
- Related Blogs: Include links to relevant blog posts under each service category.
- Service Links: Link to related services to provide more context.
- Highlight Next Steps: Guide users to explore more content or the next logical service.
Use internal links to encourage users to explore related content.
13. Add FAQs to Address Common Questions
FAQs on the hub page help answer general questions that users might have about your services, encouraging further exploration. They should be positioned above your blogs and below the services list to create a logical flow.
Key Details:
- Focus on Common Questions: Cover general topics like service categories, benefits, or timelines.
- Keep Answers Brief: Use concise answers that provide clear, helpful information.
- Position Above Blogs and Below Services: Place the FAQ section just above the related blog links and below the services list for best visibility.
Use FAQs to clarify general service information and reduce user hesitation.
14. Optimise for Mobile
Ensuring that your hub page is mobile-friendly is essential, as many users access websites from mobile devices. A responsive design ensures a seamless user experience across all devices.
Key Details:
- Make Buttons Tappable: Ensure buttons are large enough to tap easily on mobile screens.
- Readable Text: Use legible font sizes and avoid small text.
- Mobile-Friendly Menus: Use dropdowns or collapsible lists for categories to enhance navigation.
Optimise for mobile to enhance user experience across devices
Final Thoughts on Optimising Hub Pages
Improving your hub page boosts engagement and guides users to your services. Use these strategies to create a user-friendly experience that builds trust and drives conversions.
Stay tuned for our upcoming guide on optimising individual Service Pages, where we’ll explore tactics for driving specific actions and increasing conversions.
Ready to boost your website’s engagement and drive more conversions? Let Scorched Media help!
Let’s Get Started!
Contact Us Today for a free consultation and see how optimising your hub pages can transform your online presence. Don’t wait—take the first step toward better results now!
Frequently Asked Questions (FAQs)
What’s the main purpose of a hub page?
A hub page serves as a directory that offers an overview of your main services. It guides users to more detailed service pages, helping them understand your full range of offerings.
How can hub page boost engagement?
Hub pages improve engagement by offering easy navigation, clear overviews of services, and engaging elements like icons, videos, and call-to-action buttons, making it easier for users to find what they’re looking for.
Should hub pages have videos?
Yes, adding short, overview videos can enhance user engagement, provide a better understanding of your services, and make the page more dynamic.
How often should hub pages be updated?
Regularly updating your hub pages is essential—aim to refresh content, add new services, or update visuals at least quarterly to keep information accurate and relevant.
What’s the difference between hub pages and service pages?
Hub pages offer a broad overview and act as directories, while service pages provide in-depth details about specific services, aiming to drive actions like bookings or enquiries.


